Sunday, July 31, 2011

Light-and-Dark Log Cabin

I started a light-and-dark log cabin in early May, following a huge fabric-buying spree at Keepsake and Marden's (a discount store in Sanford, Maine. Don't ask, just go.). I described the motivation and process for the quilt in this post, but it's been so long that I'll go over it again. I felt a sudden compulsion to attempt to use up my (albeit meager) scrap stash and make a log cabin quilt when I returned from the NEMQG retreat. I cut up all the scraps I had into 2" strips (for 1.5" finished "logs") and pulled out a stack of 2.5" squares that I already had sitting around from a failed project that I never posted about. (Don't you love when that happens?) I cut three yards of KF Shot Cotton in Blush into 2" strips, calculated some basic measurements, and went to town sewing a mockup block. Happy with the first attempt, I chain-pieced 48 more.


...not so fast, of course. There was a period during block construction where I just could not believe that the project would ever be finished. You know the stage: when you realize you're only about 60% of the way through the blocks and you find it all but impossible to imagine that your hours of slaving away at the machine have resulted in such a meager pile of fabric. "How many more seasons of Will & Grace must I endure before I finish this thing," you ask yourself as you try to remove the chocolate stain you left on the last block you ironed.

Anyway, the blocks took me more than a month to sew. Once I finished them, I realized that the blocks together measured nearly twice the size of my entire living room. I considered renting space in the library or resorting to other bizarre venues for laying out my blocks. Luckily, my friends Rachel and Piper very generously agreed to allow me to use their dining room, even going so far as to remove almost all of the furniture in the room to accommodate this behemoth.

I'm so glad I went to a friend's house at this stage because the diamond layout I had originally planned just wasn't working, and if I hadn't had another person there to corroborate my negative feelings about my chosen layout, I might have plowed ahead. But neither of us liked it, and finally I settled on a variation of the "barn raising" variation: an off-center diamond.


I am just so happy with the layout we chose, the way the fabrics are working together...everything, really! It's all solids except for one old gingham shirt (which you can't tell is a print unless you are six inches away from it) and a few strips of Yuwa Honeycomb in black. The top measures about 95" square.


Once I had the layout set, I sewed the top together within a couple of days. I also whipped up a backing using Kona Light Jade and as many scraps from the project as possible. I have to admit that I can't conjure up the love for pieced backs that most quilters seem to possess. I think I'm going to start using fat backs, even though the fabric selection leaves much to be desired. By the time I've finished a quilt top, I'm ready to quilt it, bind it, and enjoy it. Sewing a backing just frustrates me. I have "sew-cried" my way through many a pieced back. Now I just need to find an inexpensive source for fat backs...and, of course, quilt this monster!

I hope you all had a productive weekend!

Thursday, July 28, 2011

American Folk Art Museum, Part Two


Sorry for the radio silence over the past week...I've been taking advantage of a spate of cooler weather to quilt a gigantic quilt! So without much further ado, here is the second part of my writeup about my visit to the American Folk Art Museum (part one is here).

The best part of the exhibit by far was the selection of Log Cabin quilts. They didn't have many Log Cabins in the show, but the ones they did were just beautiful. All except for one were light-and-dark variations, and the remaining quilt was a lovely Courthouse Steps variation. I learned from their placard that traditional Log Cabin quilts were foundation-pieced, not batted, and not quilted (though they were sometimes tied). I was very surprised to learn that! I will definitely use that method for the next Log Cabin I make.

I started working on a Log Cabin about two months before I went to the show, and I thought I wanted to lay mine out in the variation above. The fabric contrasts in the quilt above and the one following were so stark that the quilts almost glowed.

In the quilt above, the blocks were smaller than usual--probably only 6" or 7". I had never seen such an unusual Log Cabin block arrangement before. You wouldn't just stumble upon this arrangement; it was clearly carefully planned out. The corner blocks have a pink center square, but are completely black, whereas the rest of the blocks have a black center square and contrasting black and pink "logs." There are also tiny squares of yellow integrated into the pink side of eight blocks. Finally, the pink sides of the blocks feature a maroon strip that lends a lattice-like appearance to the finished quilt.

This Courthouse Steps quilt was one of the best I've ever seen (and my favorite quilt in the show). Its maker was a retired tailor who gathered up his satin, silk, and velvet lining scraps for several years and finally made this quilt. I took at least ten pictures of it, but the lighting was very harsh and they didn't all come out. This one made me want to make a Courthouse Steps quilt ASAP. My last quilt generated enough scraps that I think I may be able to do a small one.


The museum also displayed a beautiful quilt in the Barn Raising variation (some people today call this variation a "Center Diamond" instead).

I loved the border that the maker added. It gives the quilt more movement and dimensionality, I think.


So there you have it! Although they only displayed four or five quilts, I loved them all and thought they were the best in the show. I had been working on my own Log Cabin quilt for about two months when I went to the show, which I think is why it struck a chord with me. I'll show photos of the layout process for my Log Cabin tomorrow. But now, I'm back to quilting. Enjoy the weather, everyone!


Monday, July 18, 2011

American Folk Art Museum, Part One

I'm having a health issue right now that requires me not to spend time in the heat and sun, and because I don't have AC in my apartment, that means no sewing! Last week I tried to sew, ended up heating my apartment to almost 95, and made my condition significantly worse. So this is the perfect time to post my photos from my trip to the American Folk Art Museum in NYC.


I had wanted to go to this show with my friend Yahaira, but Amy and I ended up needing to visit the city for something during the last few days of the show, so it was the perfect opportunity for me to see it (the show closed on July 8). I took a non-quilter friend, and yall know how that can be, but she was a good sport about the whole thing.


(Excuse the glare, through which you can see my legs and feet!)

Like all quilt shows I've attended, it was organized by type of quilt, which roughly corresponded to periods of years (though not always). They also displayed a few total outliers. I plan to write a separate post about the Log Cabin quilts, but here are some of my favorites from the other portions.

The museum grouped together the applique and signature quilts from its collection. It displayed one gorgeous Baltimore Album quilt, which was by far the best example of such quilts that I have ever seen in real life:


Here is my favorite block, which depicts the Capitol building:

What struck me most about this quilt was the very modern color combination. It reminded me of a few Moda fabric lines from the last year and a half or so.


A few other images from this portion are below. Many of the quilts featured writing or images drawn directly on the front of the quilt. In this particular star signature quilt, each block contained a very detailed image, like the bird below:


The messages drawn on the following quilt were faded from wear and difficult to discern. I wish I could have read them, but they probably were never intended for the prying eyes of the public anyway! I loved the following block in particular; most of the work you see is embroidery. I've noticed many more quilts with surface embroidery recently.


This whitework quilt was the best-preserved quilt I've ever seen at a quilt show. It dates to around 1800, if you can believe it. There wasn't a tear or stain in sight.


I particularly loved this quilt, which featured a stunning likeness of our 22nd and 24th President, Mr. Grover Cleveland:


Since President Cleveland was not married when he entered office, I like to think that some young woman was pining away for the strong and handsome Grover during the making of this quilt. I'm pretty sure it was the work of a quilt guild, though.


This Dresden Plate quilt represented the entire 30s. I appreciated the work that went into it, but I didn't feel very drawn to it, even though I love repros. I guess it didn't help that some irresponsible parents were allowing their three young children to grab at it and pull on it while I was trying to take photographs. (My friend, who has been a nanny in NYC for years, didn't help matters by muttering angrily about the childrens' poor behavior.)


The show also featured a section on African American quilts, with a lovely writeup about how few African American quilts have survived, out of an unknown number that were created. I left wondering how diverse the African American quilting tradition really was and is, and if what we think of as the style of African American quilting is even wholly accurate.


Of course, there were many other quilts at the show. I hope you got a chance to go to one of the two exhibitions the museum hosted. I thought they did a beautiful job. They chose wonderful examples from their collections, and I am so happy I had the opportunity to visit. But the best is yet to come. Stay tuned for the second part of my writeup!

Saturday, July 9, 2011

A Break in Our Regularly Scheduled Programming

I wonder if any of you remember a time when I told a story on my old blog about how my aunt once informed me, upon seeing my lone Double Wedding Ring block, that the DWR is "a quilt ya make when ya got absolutely nothin' else to do...a quilt ya make when ya retiahed."

Needless to say, my aunt (who is actually my GREAT aunt, but we call her "aunty") was a big quilter in her time. Since nobody else in our extended family ever really took to quilting, she is quite enthusiastic in her support of my hobby. She never threw away any of her old quilting books, and instead passed them onto me. I have been the proud recipient of many Georgia Bonesteel books, patterns, and templates over the last year and a half...all of which I plan to save for the next sixty years and foist onto my own great-niece someday.


My aunt was diagnosed with a severe form of lung cancer in December 2010. The doctors gave her between six and eighteen months to live. But they, in their ignorance, did not realize the great force they reckoned with. Eighteen months to live if she stopped smoking a pack a day? No, thanks. Nineteen months later, this 87-year-old force of nature is still kicking, after driving herself to and from her chemo appointments the entire time.


So naturally, when the one-year mark came and went and she was doing pretty well, I decided to make her a quilt. Being 87, she has very traditional tastes, and I wanted the quilt to be as traditional as possible while still reflecting my own style, which I thought she would appreciate. I made a 14.5" string block out of fabrics from the first lines of Amy Butler fabric, and then mixed in some of my own printed scraps. I bordered the center block with an inch of Kona Bone, 2.5" of Olympus Cherry Blossom, and 8" of Kona Bone. I bound it with the Olympus fabric as well.


I did not machine-quilt it, but instead tied it by pulling the ties through to the back, a method that my friend told me her grandmother taught her. I did piece the back, but I do not have any photos of it because when I was reviewing the photos I took before I sent the quilt, I hit "delete" instead of "back" on most of them on the computer (it was early in the morning). Only these three remain.

It's just a lap quilt for when she has her chemotherapy treatments, so it isn't too large...maybe 50" square. But I really hope she likes it and uses it!

Thursday, July 7, 2011

A Long Time Coming


I've had this quilt finished for a month and a half, though I've neither sent it to the recipient nor blogged about it (I'm even sitting on it as I write). I have, however, brought it to one BMQG meeting...and that counts for something, right? The colors are difficult to capture, but they are most accurate in the photo below.


I made this little quilt for a dear friend, who was the first in our group of friends to get married and is now the first to have a baby. She is deeply religious and traditional, and I tried to make something that reflected her life and family.

The quilt is based on the Amish quilting tradition in several ways. The first and most obvious is the geometry and color patterning. As in many Amish quilts, nothing is random. What looks like a tossed-down array of triangles is actually very deliberately and evenly laid out, which you can see if you study the first and last photos in this post.


The second is the quilting. When I initially set out to quilt this (my first quilt on my new machine, btw), I tried to draw in lines with chalk so my triple-quilted triangles would look somewhat even. I had to use chalk because teal is the one color that the water-soluble pens I use to quilt will not wash out of.

The first few lines got erased when this quilt traveled with me to the NEMQG retreat, and I decided not to reapply them. The Amish have a concept that nothing is perfect except God, and this concept extends into their quilt-making. Their quilts may look perfect in books, but there is always at least one thing (albeit small) deliberately "wrong" with the quilt. I chose to keep my quilting lines organic to reflect this.

One major departure from the Amish quilting tradition was the addition of written words to this quilt. My friend is a big romantic...even her wedding invitation had an entire page of quotations about love (and yes, they were very cheesy, as befits a wedding invitation!). I quilted a few lines from an e.e. cummings poem into her quilt in a triangular pattern to echo the geometry in the quilt. The "love" you see above is the first word of the poem, and it is in a chartreuse triangle in the top-middle of the quilt. I placed all of the words in the chartreuse triangles, and I free-motion quilted all of them on there. I didn't use transfer paper or anything like that.

I backed the quilt in one color, FSDS Chamois. I used KF Shot Cotton in Sprout and Sky, Moda Crossweaves in Flamingo, Bella Solids in Teal, and Kona in Violet (I think? I don't have my color card with me right now) and another shade of Kona blue-green. I think I'm careless when it comes to recording my color choices when I use Kona because I know I have the color card, but it's never near me when I need it...

All in all, I love this quilt because I love what it illustrates about quilting: the ability to make a completely personalized gift for someone you love. What could be better than that?


Friday, May 27, 2011

Back from vacation!


Hello, friends! I've returned from my vacation! I didn't sew for almost two whole weeks. I really missed it, but Disney was fantastic! I didn't bring my phone with me anywhere or check e-mail at all...it was so liberating.


I do have two FOs to show you, but they're awaiting the perfect photo op. In the meantime, I have two blocks to show you. The first is my bee block for my wonderful friend Meaghan. She asked us to make a 12.5" block using a Ting Tong and Things tutorial. I loved the process of creating this block, and I also loved the colors she chose. I selected the ones I liked best to make a block that I think combines both of our personal styles very well. Meaghan, I hope you like it!


The second is the starting block for a very special quilt I plan to make throughout the summer. I think I swore off log cabins a while back, but I suddenly had an urge to do a log cabin quilt. After a huge fabric-buying splurge during the BMQG retreat (when I acquired 18 yards of fabric...but at least it was all on sale...), I felt so wasteful that I decided I had to make a scrap quilt. A log cabin seemed like the perfect thing.


I don't have enough solid scraps to make an entire queen-size top, so I cut into several of my newly-purchased fabrics as well. I made a significant dent in my scrap wall, and I don't have any scraps left in a few colors. See how economical I can be?


I hope you all have a fantastic Memorial Day weekend and get a lot of sewing time in!

Saturday, May 7, 2011

Has it really been so long?


My apologies for the radio silence! My work schedule has been extremely hectic, to say the least, and I've been working on the same very small baby quilt for several weeks now. And it isn't very exciting! We had so many rainy days in a row that I couldn't get a photo of the top when I finished it, but here's a preview of the quilted and unbound quilt:

Since I took this photo, I made my binding using Yahaira's bias-binding tutorial, and I completely mucked it up. I think I have some sort of mental defect when it comes to bias binding. Yahaira described the method to me when I was visiting her, and I just COULD NOT understand it (not because of her explanation, but because of my own inability to comprehend 3D space...if you remember those tests you had to take in elementary school about spacial reasoning, perhaps you will appreciate that I regularly scored in the bottom 5-10%).


She explained that she used to belong to a very traditional guild, and some of the older/very experienced quilters showed her this method. They always have the best tricks, don't they? Anyway, the tutorial is great--detailed pictures and explanatory text--but I am an idiot when it comes to bias binding, and I ended up only being able to use about half of what I made. A lot of Moda Crossweave went into my trash can. By the grace of God, I ended up with about 3" remaining after I sewed it on.

Attaching it was followed by an attempt at the invisible join, which (somewhat inevitably) resulted in tears. But then I invented my own method of invisibly joining binding, which does not involve trying to line up unmatchable diagonal lines and sewing through your finger, so I will use that forever. When I have recovered from the trauma of the first invisible join attempt, I will post a short tutorial of my modification.


I also ordered some perle cotton because I'm hoping to hand-quilt my Ocean Waves quilt. I feel like the quilt wants to be hand-quilted, and since I've wanted to try big-stitch hand-quilting forEVER (since Lisa B. explained it to me at a NEMQG meeting early last year), it's serendipity. I'm using Anna Maria Horner's fantastic hand-quilting tutorial.

Now onto piecing the back and finishing the binding of my baby quilt...

Thursday, April 28, 2011

The Search for the Perfect Machine, Part Four: Purchase


...And then we came to the end.

Before I reveal which one I ended up buying, I want to insert some information about one more machine: the Juki TL2010Q (formerly 98Q).
The amazing (AMAZING!!) Joanna of Applique Today e-mailed me and suggested I think about purchasing this one instead. She also gave me some very important machine-buying advice. I asked her if she used her Juki for both piecing and quilting, and here was her response:

Monet, I do EVERYTHING on that machine! It is amazing for piecing. I use it for piecing, quilting, making clothes, curtains, you name it I make it on it! I have a Janome with all the fancy stitches, but as a quilter, I never ever use them. It's sat in the garage for the last 5 years collecting dust.

The speed thing would be an issue for you for all of about 15 minutes. I've had so many people use my machine, even children, and they get used to it very quickly. You get a feel for the pedal and can go slow, a stitch at a time, or fast, 1500 stitches per minute. I know it seems counter intuitive, but it really is easier to get smoother quilting lines the faster you go. All it takes is practice...

Even if you don't go for the Juki, still check out some of the other semi-industrial straight stitch machines - you would never look back! I really really recommend getting a machine with a knee lift. It was life-changing to me! You never ever need to lift the foot by hand which is HUGE when you are machine quilting. And the automatic thread cutter is something I can't go without now either. And I don't mean a button on the machine - it's on the foot pedal, so you tap your foot. When you are quilting (and piecing!) the more your hands can stay free, the better.

...I think the people who benefit most from Berninas are those doing beautiful heirloom sewing. People who actually use all those lovely stitches...If you think you will, then great! If not, you need to get the best quality machine you can get with the LEAST amount of stitches! For me, that is one, the straight stitch. I think a zig zag would be nice, but honestly, I have never needed to use it bad enough in the last 4 years to pull my Janome out of the garage!

Also, you are not going to want to keep the same machine forever. Our mothers did because all they did was make clothes in the 70's. I remember! They weren't making works of art like quilts. Quilts require different things than clothing...

If you want to quilt your own quilts, and they are bigger than a yard square, you NEED an amazing dedicated quilting machine. So here is my list of what you should look for, regardless of the brand. They are things that in my humble opinion are the only things you need for quilting:

Big throat space
Big flat bed
Needle down
Automatic thread cutting
Fast stitching
Easy to lower feed dogs (flick of a switch)


So there you have it, from a truly amazing quilter who has really put her machine to the test! I thought about what she said and even found a dealer in this area (Reliable Sewing Machines in Stoughton).

But in the end, I had to go with...

The Janome 7700/Horizon. It was my mom who convinced me. I haven't even finished the draperies, shower curtain, etc. in my apartment, and my mother told me that she didn't think I should buy a machine without an automatic buttonholer when I still have home decorating to do. Did I need a machine with 11 buttonholes? Probably not. But they sure are nice to have...

I'll admit that the most convincing feature was the 11" of harp space (11 must be Janome's lucky number). Once you have sewed with that much harp space, you won't go back. I would recommend not trying it unless you are prepared to pay for it. I could stick my head under that thing. Not that I would. I'm just saying.

In the end, it came down to a feeling. People tell you that you will "bond" with a certain machine, and they're right. It just felt right to me to sew on the Horizon. I didn't feel that way on anything else I tried.

I haven't had much time to play with it yet (although I did watch the hilarious instructional DVD while I set it up), and I'll post as soon as I do. For now, I have to finish up my work so I can go pack for the BMQG retreat!!

Sunday, April 24, 2011

The Search For the Perfect Machine, Part Three: Post-test-drive

(The first and second posts in this series are here and here.)

The machines I test drove were at a dealer about thirty minutes away from me. The dealer sells the Bernina 350PE and 440QE, as well as the Janome 6600 and 7700. Four of the six in one place not far from home…hooray.

I brought the following things with me:

1. Four kinds of fabric I use frequently, including one type that my machine hates (KF Shot Cotton)

2. Four small quilt sandwiches (with single layers of cotton fabric and cotton batting) for testing free-motion quilting

3. One large quilt sandwich for testing how much the harp could accommodate and how the quality of FMQ was affected by having a great deal of fabric jammed into the machine. My sandwich was not an actual quilt top since it was being sacrificed to the quilting gods, but I did use a thick broadcloth fabric on one side and wool on the other to approximate the thickness of a pieced top

(Wild turkeys in the driveway this morning! I love them!)

Step 1: straight stitching/tour of basic functions

Bernina 350 PE. I eliminated this almost immediately because the machine seemed too basic for me (although I’m sure it is a very good machine). This is a great machine for someone who can afford to spend quite a bit of money to learn quilting, but it was obvious that its narrow range of functions and capabilities meant I couldn’t take my sewing much further than the level I’m on now. Next.

Bernina 440QE. I did a few rows of straight stitching with the saleswoman sitting less than an inch from me, which was nerve-racking. Does anyone else feel like quilt shop employees are always judging you? Then don’t ever sew in front of them. Anyway, I used the patchwork foot and did see that amazing Bernina stitch quality that people rave about right away. The 440’s stitches were perfect. The machine was remarkably quiet and soothing. The harp space didn’t seem quite as small when I was piecing on it, and I liked the attached extension table.

Janome 6600. This machine looks like you expect a solid sewing machine to look: parts poking out everywhere, huge stitch guide on top, large throat, thick foundation. It was a nice machine and I got to try it out for approximately thirty seconds before the saleslady pulled me over to the Horizon.

Janome 7700. As I said in my earlier post, I wasn’t excited about the Horizon when I began looking at machines. If it had been list price, I would not have even tried it. But when I got there, the machine drew me like a moth to a flame. It was animal magnetism. I tried some basic stitches with the ¼” foot (yeah, the original one that everyone hates, and it did skew to the left, for the record), and then stitched with the dual-feed function turned on. If you were drowning and you happened to be holding onto the end of a quilted tablerunner that was under the Janome Horizon dual-feed foot, it would save your life. There's some horsepower behind that.

Step 2: free-motion/advanced functions

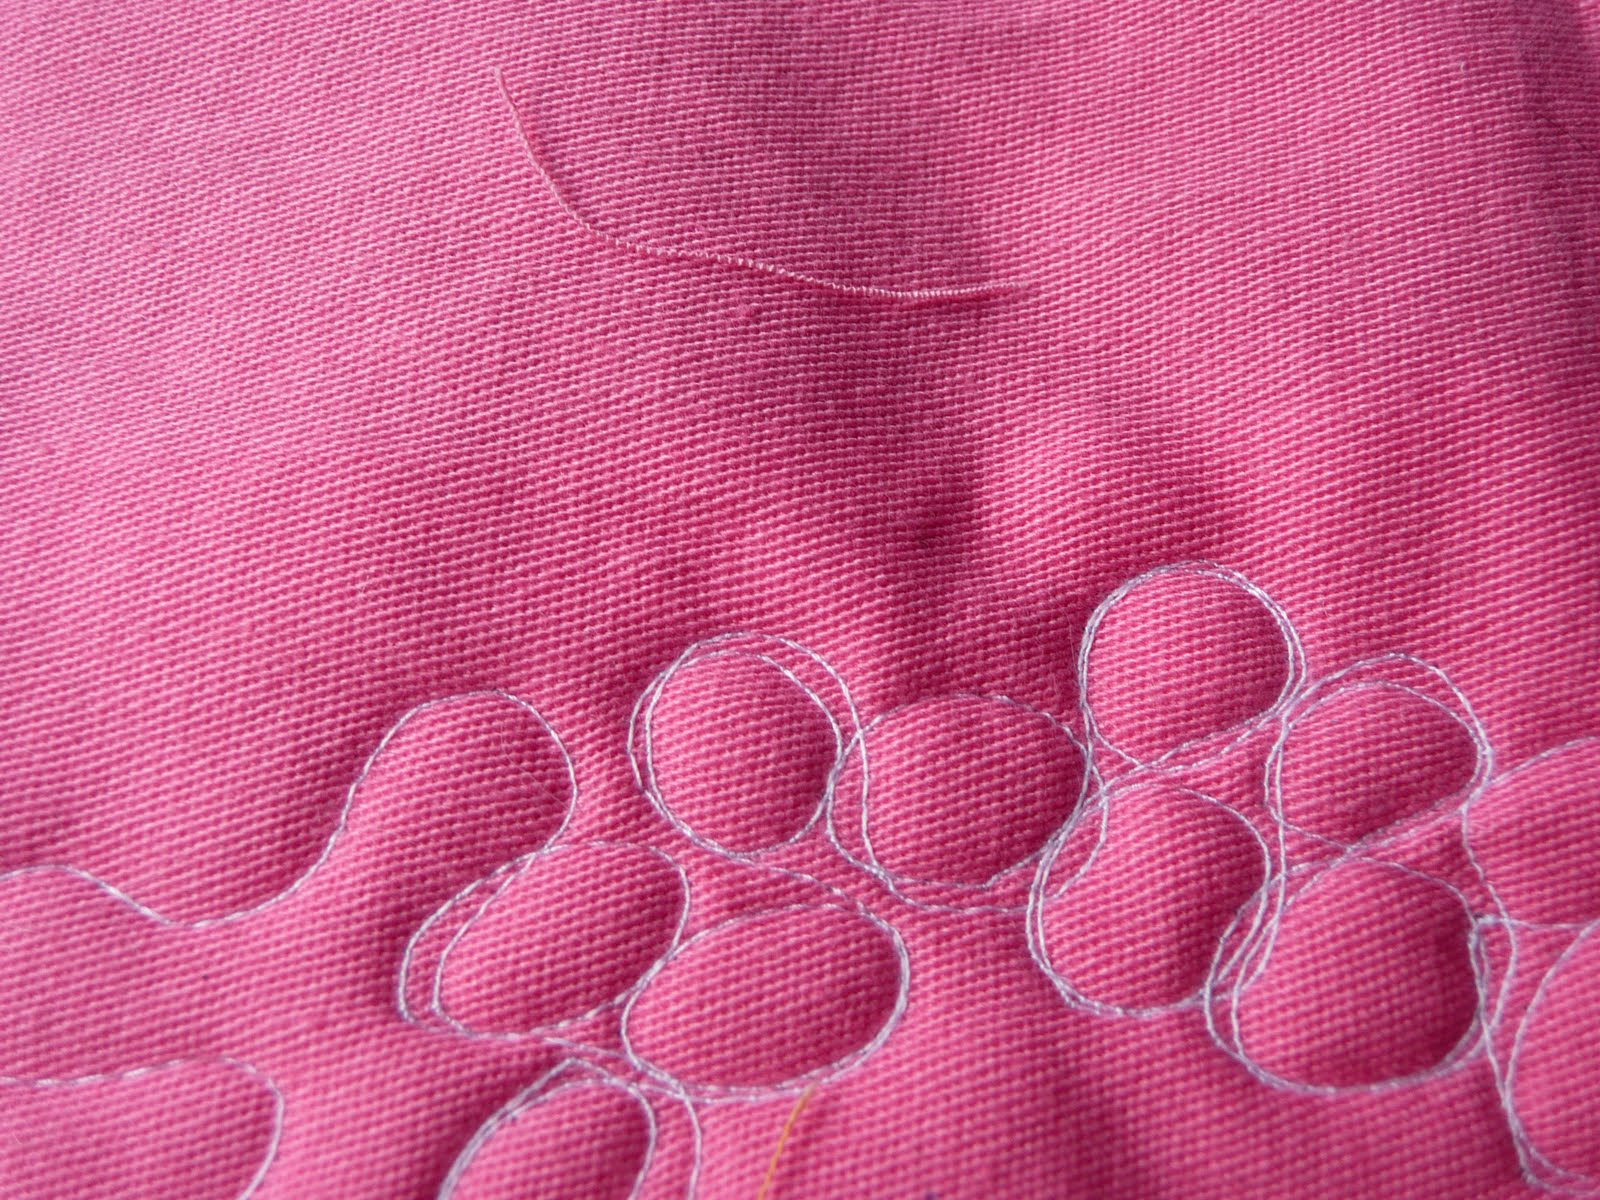
Janome 7700. I asked the lady at the shop to put on the FMQ foot so I could try it out. She put on a standard, clear plastic foot, and I grabbed one of my quilt sandwiches and sat down. The top thread broke after five seconds of quilting and the stitches were barely distinguishable (see image above).

The fabric was difficult to manipulate, and the thread continued breaking…four or five times in a few minutes’ worth of quilting. One of the other saleswomen actually heard it snap from several feet away. The foot was bouncing up and down so much that I could barely see the fabric and it made me dizzy. I decided to open the manual and make sure it was the right foot. Of course, it wasn’t. The 7700 has a special adjustable, two-spring foot: a foot that could not be located anywhere in the shop. Here's another shot of how awful it looked (and yeah, I had to write on the fabric to keep track of the samples):

Bernina 440QE. It took the woman a good ten or fifteen minutes to figure out how to put the BSR foot on. I sat patiently…this was my moment! And the BSR foot, as has been said many times before, did not disappoint. Damn. That thing was amazing. My stitches looked professional [image]. Happy joy. But as I moved the large quilt sandwich around, I realized that I was quite uncomfortable. My worst fears had been realized: the small harp space was an insurmountable issue. I was not bonding with this machine.

Janome 6600. When I sat down to try FMQ on this machine, I also spent more time playing around with its other features. There is something so nice about using this machine. It’s very easy to use, the screen selections are more intuitive than other computerized machines, the stitch quality is great, etc. etc. The saleswoman (one of those people who has five or six different machines at home for different purposes) said she had one and she “would NEVER get rid of it,” which I highly doubted after seeing her stroking the Horizon gently when I wasn’t looking. So anyway, I had a hard time achieving proper tension when FMQ on this machine, but I’m sure I could have worked it out…and even with the poor tension on the back, it looked great from the front. I felt so comfortable working on the 6600:

Janome 7700, round two. I unearthed a proper foot for sale at the store, so I forced them to open it and stick it on the machine. I achieved MUCH, MUCH better results with the two-spring foot. The tension was off no matter what I did, though. The machine repairman came out and talked to me about it at length, trying to convince me that it was easily remedied. I felt concerned about it. I know that tension is an issue with every machine, but I still felt like such an expensive machine should be able to achieve proper tension after fifteen adjustments.

So anyway, my dealership ended up offering me a great deal on the Horizon. I decided to go home and think about it for a few days. I had made various people promise that if they knew I came home with a sewing machine on the first day I looked, they would force me to return it. I had discussed the issues people were reporting with the Horizon to the ladies at the dealership, and I was then subjected to numerous lectures that started with phrases like “You know, I just don’t trust the internet. Those people are probably lying, you know.” In the Janome 7700 Yahoo Group? “You just shouldn’t listen to the people on the internet.” Okay.

I’ll be back soon with the rest of my saga. Until then, I hope yall are having a nice Easter, if you celebrate! If you're still reading, you are a champ and have my eternal devotion!